When you’re learning to draw the female figure, mastering the foundation is everything. Forget about memorising rigid rules. The real secret is learning to see the body as a collection of simple, three-dimensional shapes. Get this right, and you build a figure with real weight and presence—a solid framework you can add all the beautiful details to later.
Building a Believable Foundation
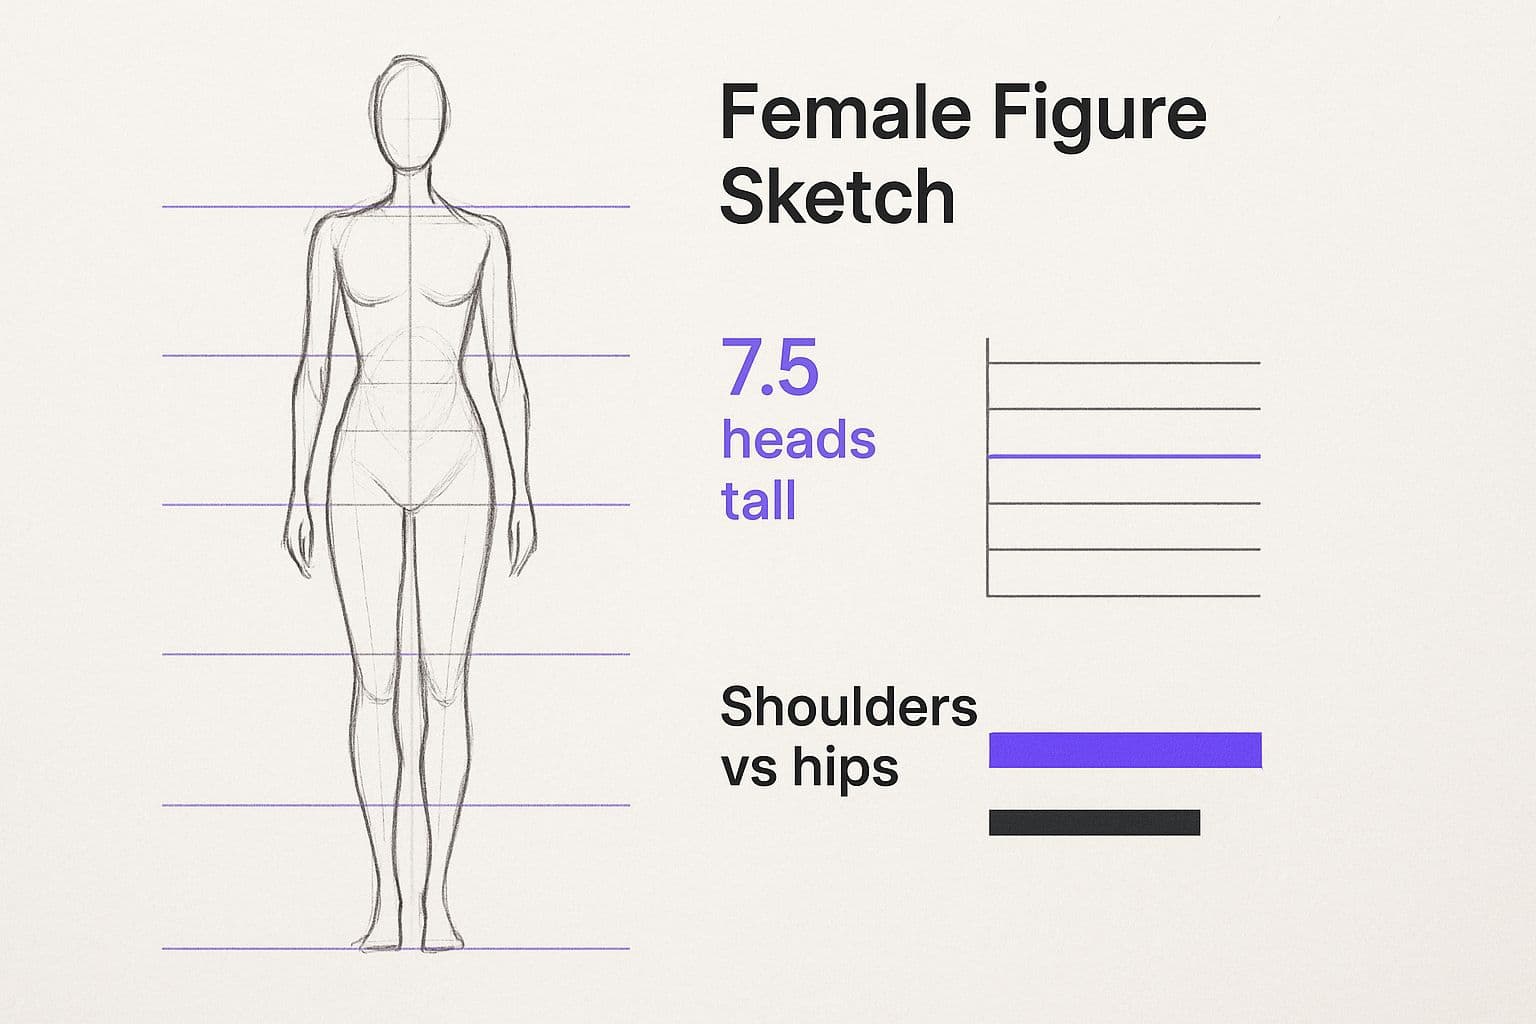
Before you even think about defining a single muscle or casting a shadow, your figure needs a solid skeleton. So many artists get hung up on the classic ‘8 heads tall’ rule, but honestly, it’s just a guideline. A starting point. It’s definitely not an unbreakable law.
True anatomical drawing starts by building a simple, poseable mannequin from basic geometric forms. This isn’t about creating a stiff robot; it’s about constructing an internal structure that feels three-dimensional and, most importantly, alive.
Think of it like an architect designing a building. The foundation has to be solid, the proportions have to make sense, and the framework needs to be balanced. Without that, the whole thing just collapses. In drawing, your simple mannequin does the exact same job, making sure everything you add later—muscles, fat, and skin—has a logical place to sit.
From Simple Shapes to a Solid Mannequin
The first step is to break down the ridiculously complex human form into parts you can actually manage. This is way more about visualisation than it is about rote memorisation.
- Joints as Spheres: Use spheres for the major joints like shoulders, elbows, hips, and knees. Spheres are perfect because they can rotate in any direction, which immediately suggests movement and flexibility.
- Limbs as Cylinders: Think of the arms and legs as simple cylinders or maybe slightly tapered ovals. This forces you to think about them in 3D from the get-go, considering how light wraps around them and how they look from different angles.
- Torso as Blocks: You can simplify the torso into two main masses: a box or oval for the rib cage and another for the pelvis. The real magic happens when you connect these two blocks with a flexible spine, letting you create all those natural, dynamic twists and bends.
When you put these simple shapes together, you create this fantastic 'mannequin' you can pose in a million different ways. The process forces you to consider volume and perspective right from the start, which helps you avoid that flat, 'pasted-on' look that plagues so many beginner figure drawings.
A massive mistake I see people make is drawing the outline of the figure first. Don't do it. Build from the inside out. Construct your simple, shape-based skeleton, and you'll find the final contour practically draws itself.
Key Proportional Landmarks to Know
While every body is unique, a few key proportional landmarks will help you keep things looking realistic. These aren't strict measurements to obsess over, but they're super helpful guides for checking your work as you go.
For instance, in a standard standing pose, the elbows often line up with the navel. The fingertips? They usually reach about mid-thigh.
Another critical relationship to nail in female anatomy is the shoulder-to-hip ratio. Generally, the female pelvis is wider than the shoulders, which creates a very different silhouette from the typically broader-shouldered male form. Capturing this subtle difference is absolutely essential for a convincing figure. Understanding these relationships is just as crucial as knowing your subject matter, much like how a coach needs deep knowledge to guide their clients. For those in related fields, learning about topics like the average health coach salary can provide similar foundational insights into their profession.
Ultimately, this whole foundational stage is about more than just getting the technical stuff right. It's about building a structure that has potential. It’s the difference between a lifeless copy and a figure that feels grounded in reality, ready to be fleshed out with all the beautiful complexities of human anatomy. Practice building these simple mannequins over and over, from reference and from your imagination, until it becomes second nature.
Mapping the Rhythms of the Torso
The torso is the powerhouse of your figure drawing. Forget the face or the hands for a second—this is where posture is born. It's where gesture originates, injecting your artwork with life and energy. Nailing its structure is the difference between a figure that feels dynamic and one that’s just… stiff.
I find it helps to break this complex area down into two big, interconnected masses: the rib cage and the pelvic block. Think of them as separate but related forms that can twist, tilt, and bend against each other. This mental model is your key to visualising how the torso moves as a single, fluid unit.
This approach stops the figure from looking like a rigid plank. You can simplify the rib cage into an egg or barrel shape, while the pelvis is more like a tilted box or bowl. The spine? That's the flexible connector between them, the secret to all those elegant curves and powerful stances you want to capture.
Finding Your Structural Anchor Points
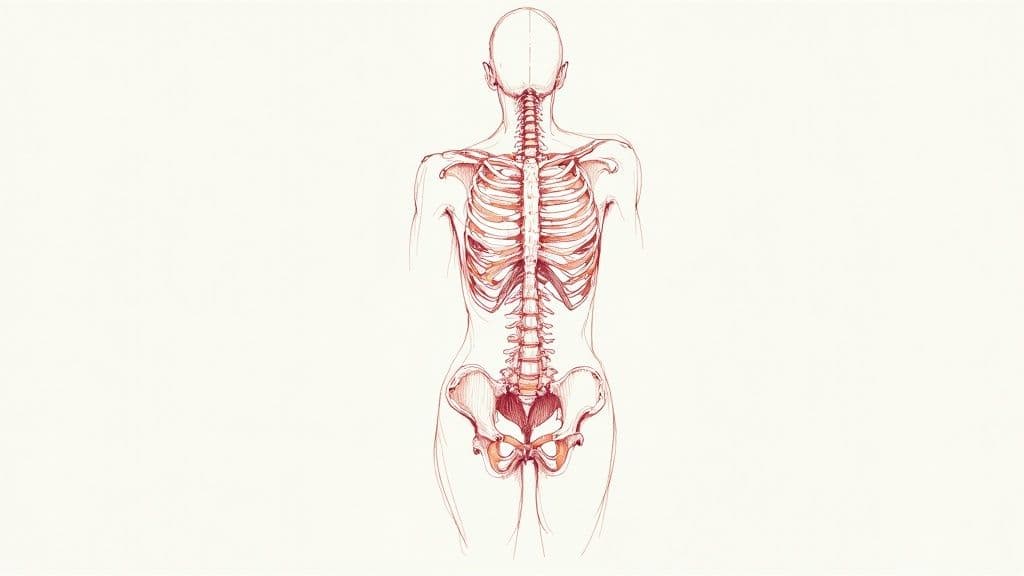
To draw the torso accurately, you need to hunt for its key bony landmarks. These are the points on the skeleton that are close to the skin's surface. They act as reliable anchor points for your drawing, helping you keep your proportions locked in from any angle.
Think of them as the North Star for your anatomical map.
- Clavicles (Collarbones): These S-shaped bones at the top of the chest are a must. They define the shoulder width and connect the rib cage to the arms. Always sketch them in, even if it's just a simple line.
- Sternum (Breastbone): This is the flat bone running right down the centre of the chest. The little dip at the top, where the clavicles meet, is a crucial landmark for finding the body's centreline.
- The Iliac Crest: This is that top, curving edge of the pelvic bone. You can often see or feel it as the "hip bone." It’s a vital point for establishing the tilt and rotation of the hips. You can’t draw a believable pose without it.
This schematic shows a more gestural way to map out female proportions, highlighting the relationship between head height, shoulder width, and hip width.
9d2bf423-5f22-4e60-8ea1-8d90dada9988.jpg
Visualising these ratios helps ground your drawing in believable anatomy before you even think about adding muscle and soft tissue.
The Power of Contrapposto
Once you're comfortable with the torso's basic structure, you can introduce a concept that will instantly make your figures more dynamic: contrapposto. It sounds fancy, but it's just the natural way a human stands when shifting their weight onto one leg.
This simple weight shift causes the hips and shoulders to tilt in opposite directions, creating a subtle S-curve through the spine. One hip rises, while the shoulder on that same side drops. The result is an asymmetrical pose that feels relaxed, natural, and balanced.
When you master contrapposto, you move from drawing static mannequins to creating figures that feel like they could take a breath and walk off the page. It's the secret ingredient for injecting effortless realism into your work.
Practising this is non-negotiable. Look at classical sculptures or just photos of people standing around. Notice how one leg is engaged (the weight-bearing leg) and the other is relaxed. Sketch those opposing tilts of the shoulder and hip lines over and over until it becomes second nature.
Unfortunately, a broader societal discomfort with the human body sometimes creates educational gaps. Research from Manchester University NHS Foundation Trust in the UK found significant gaps in public knowledge of female anatomy, which can indirectly affect artistic education. By pursuing accurate anatomical knowledge, artists can help create better representations. You can read more about these findings and their implications.
Before we move on, here’s a quick-reference table to help you lock in the most important landmarks of the torso. These are the non-negotiables I look for in every figure I draw.
Key Anatomical Landmarks of the Female Torso
| Anatomical Landmark | Artistic Significance | Common Drawing Mistake |
|---|---|---|
| Clavicles (Collarbones) | Defines shoulder width and the top plane of the chest. | Drawing them as perfectly straight lines instead of gentle S-curves. |
| Sternum (Breastbone) | Provides the central axis of the rib cage. The top notch is a key anchor. | Making it too long or short, which throws off rib cage proportions. |
| Iliac Crest (Hip Bones) | Establishes the tilt and rotation of the pelvis. Essential for contrapposto. | Drawing the hips as a symmetrical box, ignoring the natural tilt and curve. |
| Rib Cage Arch | Marks the bottom boundary of the rib cage and top of the abdomen. | Ignoring its curve, leading to a stiff, unnatural-looking midsection. |
| Spine (Visible as Furrow) | Indicates the gesture and twist of the back. | Drawing backs as flat planes without suggesting the underlying spinal curve. |
Getting these landmarks right provides the scaffolding for everything else. It’s the difference between a drawing that feels solid and one that looks flimsy.
Connecting Form with Function
Understanding the torso isn't just about placing bones correctly; it's about seeing how the muscles stretch and squeeze to create movement. You don’t need a surgeon’s knowledge, but recognising a few key muscle groups will absolutely transform your drawings.
Key groups to watch are the pectorals on the chest, the obliques at the sides of the waist, and the latissimus dorsi creating that V-shape of the back. These muscles are constantly stretching and compressing as the torso twists and bends.
For instance, when the torso twists, the obliques on one side will stretch out while the other side contracts and bunches up. Showing that tension and compression adds another layer of realism. It’s a signal that you understand not just what the body looks like, but how it actually works.
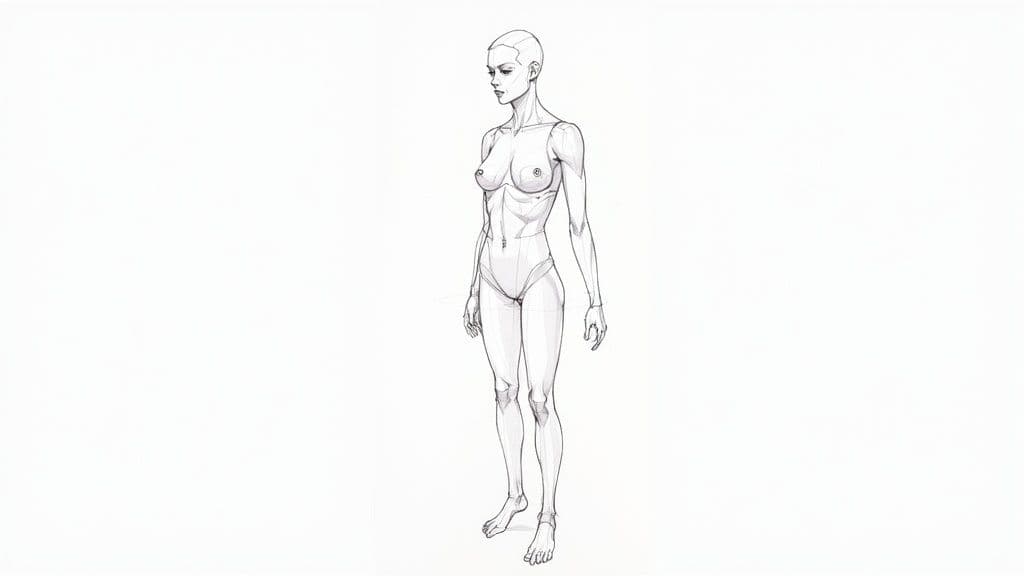
Nailing the Arms and Legs
Let's be honest, arms and legs can be a real pain. They’re so much more than just tubes stuck to the body. They are complex, powerful structures that tell a story of movement, strength, and grace. If the limbs in your drawings look stiff, disconnected, or just plain weird, it's almost always because the underlying mechanics have been missed.
The secret isn't to memorise every single muscle. It's to simplify their anatomy into functional, manageable shapes that you can build from any angle.
11316d85-1a4e-4999-8f70-7094511ccc86.jpg
This is about getting past just copying outlines. We need to think about the big players—biceps, triceps, quads, and hamstrings—not as static blobs, but as forms that wrap around bone. They stretch, they bunch up, and they create those beautiful, flowing contours that make a figure feel alive.
Decoding the Arm's Structure
The arm is a brilliant study in opposites. Think of it as a simple machine built for pushing and pulling. For artists, capturing that push-pull relationship is everything.
First, picture the humerus, the single bone in the upper arm. Now, imagine the two main muscle groups that wrap around it:
- The Biceps: Slapped on the front, this muscle contracts to bend the elbow. When it flexes, it creates that classic rounded, powerful shape.
- The Triceps: On the back, this muscle does the exact opposite—it straightens the arm. It's actually a bigger, horseshoe-shaped group that gives the back of the arm its definition.
A classic beginner mistake is drawing both muscles with the same tension. That’s not how it works. If the bicep is flexed and bunched up, the tricep has to be stretched out and elongated. Showing this interplay is what makes a pose look dynamic instead of wooden.
The forearm is trickier, no doubt. It’s a whole bundle of muscles that twist and overlap to rotate the wrist. To keep it simple, think of the forearm as a tapering oval shape. It’s thickest near the elbow and slimmest right at the wrist. Get that overall gesture and taper down first, then worry about adding the subtle muscular details later.
The Challenge of Elbows and Knees
Joints are where so many drawings just fall apart. Elbows and knees can feel bony, awkward, and frustrating to get right, but they are absolutely crucial anchor points for the limbs. Don't try to hide them; learn to use their structure to your advantage.
The trick is to stop seeing them as simple hinges and start thinking of them as interlocking forms. The elbow isn't just a bendy point. It's where the humerus meets the two forearm bones (the radius and ulna). That bony point you can feel is the end of the ulna. When the arm is straight, it lines up with the two bumps at the end of the humerus. When the arm bends, it swings down to form the sharp point of the elbow.
The knee works in a similar way, dominated by the patella (the kneecap). It’s a small, floating bone that sits right in front of the joint where the femur (thigh bone) connects to the tibia (shin bone).
Stop drawing knees and elbows as simple circles. It makes them look weak and rubbery. Instead, think of them as a slightly squared-off, blocky shape that connects the cylinders of the upper and lower limbs. This simple shift in thinking adds a sense of solid, three-dimensional structure that a simple curve just can't match.
Building Powerful, Elegant Legs
Legs follow the same basic principles as the arms, just on a much bigger, more powerful scale. They're built for stability and propulsion, and their muscle groups are some of the largest in the entire body.
The upper leg is dominated by two huge opposing groups:
- The Quadriceps: A massive group of four muscles on the front of the thigh. Their job is to straighten the leg, and they create a powerful, rounded form that tapers down towards the knee.
- The Hamstrings: These are the muscles on the back of the thigh that bend the knee. They are often less defined than the quads but are absolutely essential for creating that natural, subtle curve to the back of the leg.
On the lower leg, it's all about the calf muscles (gastrocnemius) at the back. They form a very distinct diamond shape that sits higher on the inside of the leg than the outside—a small detail that makes a big difference. The front of the lower leg is mostly bone: the sharp, hard edge of the tibia, or shin bone. Showing the contrast between the soft, muscular calf and the hard, bony shin is a key part of drawing a realistic leg.
Understanding female anatomy for drawing is a crucial skill, and not just for artists. The scale of this becomes clear when you look at population data. In England, as of June 2020, the female population aged 16 or older was about 23.3 million. A women's health survey that reached over 95,000 individuals represented only about 0.4% of this group, showing how anatomical and health data often comes from very small segments. Discover more insights about these demographic findings from the UK Government. For an artist, this just highlights why it's so important to seek out solid anatomical knowledge to create work that's both accurate and truly representative.
By focusing on these major muscle groups and how they relate to the skeleton underneath, you can start building limbs that feel both strong and graceful—and look like they naturally belong to the figure you're drawing.
Drawing Soft Tissues and Surface Forms
A drawing really starts to breathe once you move past the skeleton and begin layering on the soft, living forms. This is where you get to suggest actual flesh, skin, and weight. It’s the magic step that turns a stiff mannequin into a believable, expressive human figure.
Getting this right means understanding how body fat is distributed and how it creates the softer, rounder contours typical of the female form. The secret is to think about these tissues not as shapes you just stick on, but as volumes that respond to gravity, pressure, and the structure underneath.
This way of thinking is what will save you from that stiff, ‘pasted-on’ look. It’s all about capturing the subtle compression of flesh where a figure is sitting, or the gentle pull of gravity on the breasts and buttocks. This is where your study of anatomy becomes a true art form.
Understanding Fat Distribution
While muscle gives the body its hard, defined shapes, it's the adipose tissue (body fat) that creates the overall softness and silhouette. In the female form, fat tends to gather in specific areas, which is key to nailing the proportions.
You'll want to pay close attention to a few key zones:
- The Breasts: These are mostly made of glandular and fatty tissue, so their shape is heavily influenced by gravity and what the pectoral muscles underneath are doing.
- The Hips, Buttocks, and Thighs: This is where you'll find significant fat pads that create the classic pear or hourglass silhouettes.
- The Lower Abdomen and Pubic Mound: These areas also hold subcutaneous fat, softening the transition from the torso down to the legs.
It’s crucial to observe how these soft tissues interact with each other and the environment. For instance, when an arm presses against the torso, the fat and skin on both surfaces will compress and bulge out slightly. Nailing these little interactions is what sells the realism of your drawing.
Think of soft tissue like a water balloon. It has volume and weight, but its shape is malleable. It squashes, stretches, and sags depending on what forces are acting on it. This mindset is way more effective than trying to memorise a single, static outline.
Rendering Form with Light and Shadow
The texture and volume of skin and flesh are revealed almost entirely through how light hits them. Hard, bony areas like the shin or collarbone will catch light with sharp, defined highlights. Softer, fatty areas, on the other hand, will have much gentler, more gradual transitions from light to shadow.
For anyone looking to really get this right, you can pick up a lot from mastering photography lighting setups. Seriously, understanding how different light sources define form is a skill that translates directly from photography to drawing.
When you're drawing, use softer shading techniques and blended tones to represent flesh. The core shadow on a ripped bicep is going to be much sharper and more defined than the core shadow on a soft thigh. This subtle difference in your rendering tells the viewer exactly what kind of surface they're looking at.
Of course, accurate anatomy means being aware of human diversity. For example, a 2021 national pilot survey on women's reproductive health in England is a good reminder for artists. It showed an overrepresentation of White ethnicity at 93.2%, which impacts how anatomical knowledge is often generalised. This just highlights the need for artists to study and understand a wide range of anatomical variations to portray female anatomy authentically. You can discover more insights about these findings on the UK government's website.
The Influence of Underlying Anatomy
Even though you’re drawing soft forms, they are always shaped by the skeleton and muscles underneath. A classic mistake is to draw soft tissue as generic, lumpy shapes that have no connection to the body's actual structure.
The gluteal muscles, for instance, have very specific attachment points on the pelvis and femur. The fatty tissue that sits over them follows that underlying muscular shape. Understanding this relationship helps you draw a backside that looks powerful and structurally sound, not just like two balloons stuck to the body.
This principle applies everywhere, from the belly to the upper arms. Recognising this connection between muscle and fat is as fundamental as using solid fitness program templates that are built upon proven exercise principles. They both rely on a solid foundation.
By combining what you know about the skeleton, muscle groups, and fat distribution, you’ll be able to create figure drawings that have a convincing sense of weight, structure, and life.
Time to Actually Practise Your Anatomy
Theory is your map, but practice is the only thing that gets you to the destination. Knowing the names of all the muscles is great, but training your hand and eye to feel their form instinctively? That's a whole different game. This section is all about bridging that gap with targeted, practical exercises I've used for years to cement my understanding of the female form.
We're going to move beyond just sitting in a traditional life drawing class. The goal here is to give you specific drills you can do anywhere, anytime. These aren't one-off tasks; they're habits that will train you to see the underlying structure in the world around you, building the muscle memory that leads to confident, expressive figure drawing.
The Thirty-Second Gesture Drill
Honestly, if you only do one exercise, make it this one. The gesture drawing is the single most powerful tool for capturing life and movement. The goal isn't a finished piece. It's about capturing the essence of a pose—its energy, rhythm, and flow—as fast as humanly possible.
Set a timer for 30 seconds. Find a reference photo, or better yet, look at people in a café, and quickly sketch the main line of action. Don't think about details. Don't even think about outlines. Just focus on the curve of the spine, the angle of the hips and shoulders, and the general direction of the limbs. It’s pure feeling, not precision.
When the timer goes off, stop. Immediately move on to the next one. Do this for 10-15 minutes every single day. At first, your drawings will look like chaotic scribbles. That’s not just okay; it's the whole point. Over time, you'll train your brain to instantly see the core gesture of any pose, which is the foundation of every great figure drawing ever made.
Mannequin Studies from Your Imagination
Once you've got a handle on gesture, the next step is to test your understanding of three-dimensional form. This exercise forces you to build the figure from the inside out, relying on your knowledge of structure rather than just copying a contour you see.
Here’s the breakdown:
- Start with a simple gesture line. This gives your pose a dynamic foundation.
- Build the mannequin. Use simple shapes—a box for the pelvis, an egg for the ribcage, cylinders for limbs, and spheres for joints—to construct a 3D mannequin over your gesture line.
- Rotate it in your mind. This is the hard part. Try to imagine what this simple mannequin would look like from a slightly different angle and sketch that version next to your first one.
This drill is incredibly challenging, but the payoff is huge. It directly tests your grasp of perspective and proportion, forcing you to solve anatomical problems instead of just observing them. You’re building a mental library of forms you can pull from when drawing without a direct reference.
The ability to construct a believable figure from imagination is a true sign of mastery. It shows you haven't just memorised shapes, but that you fundamentally understand how the human body occupies space.
Weekly Muscle Group Deep Dives
To really understand how the body works, you've got to zoom in. Way in. The secret is to dedicate one week to studying a single part of the body. For example, one week could be focused entirely on the shoulder girdle—the clavicle, scapula, and deltoid muscles.
During that week, do everything you can to understand that one area:
- Gather Reference: Find photos of shoulders from every angle you can imagine.
- Study the Anatomy: Look at anatomical diagrams. See how the muscles actually attach to the bones.
- Draw, Draw, Draw: Fill entire pages with sketches of just that muscle group. Draw it in action, at rest, flexed, and stretched.
This focused approach stops you from feeling overwhelmed by the complexity of the entire body. By breaking your study into manageable chunks, you build a deep, lasting knowledge base one piece at a time. The commitment to this kind of focused learning is key, much like how educational platforms use strong student retention strategies to ensure consistent progress.
These exercises, when you make them a habit, will completely transform your approach to drawing the female form. They move you from being a passive copier of what you see to an active constructor of believable human figures. It’s all about turning observation into a powerful learning tool and building the deep, intuitive knowledge you need to draw with genuine confidence.
Got Questions About Drawing Female Anatomy? Let's Unpack Them.
As you dive deeper into drawing the female form, you're bound to hit a few common roadblocks. It happens to everyone. Whether it's tricky foreshortening or just trying to draw figures that don't look like they've been carved from wood, we've all been there. Let's tackle some of the most frequent sticking points head-on.

8963e678-fd9a-41e8-aab7-379f82e52e35.jpg
One of the biggest hurdles is escaping that dreaded "mannequin" look. If your figures feel rigid and lifeless, the problem almost always traces back to your initial gesture drawing. A stiff foundation builds a stiff final piece. The fix? Focus on nailing the line of action first—a single, flowing line that captures the entire energy of the pose—before you add any structure.
Another question I hear all the time is how to make figures actually look three-dimensional. The key is to stop thinking in flat outlines and start building with simple 3D forms. It's a total game-changer.
- Think in Volumes: Use cylinders for the arms and legs, spheres for the joints, and boxy forms for the torso and pelvis.
- Use Contour Lines: Don't just draw the outline. Wrap lines around your forms to describe their volume, kind of like the latitude lines on a globe.
- Overlapping Forms: Deliberately let parts of the body overlap each other. This is a simple but powerful trick for creating a real sense of depth.
This approach forces you to think about how the body occupies space, instantly injecting a dose of reality and dimension into your work.
How Do I Handle Foreshortening Without Crying?
Ah, foreshortening. It's the effect where an object looks shorter because it's angled toward you, and yeah, it can be seriously intimidating. The best way I've found to tackle it is to break the limb down into those simple geometric shapes we just talked about.
A foreshortened arm isn't some weird, stumpy limb; it's just a cylinder seen from an extreme angle. Try drawing the two circular ends of the cylinder first, making sure one overlaps the other. This immediately establishes the direction and depth, giving you a solid structural guide to build upon. The illusion becomes way more convincing.
The biggest mistake artists make with foreshortening is drawing what they know (an arm is long) instead of what they see (the arm looks short from this angle). You have to trust your eyes and lean on your simple forms, not your brain's pre-conceived ideas about length.
Finally, a lot of artists wonder how much anatomy they really need to memorise. Look, you don't need a surgeon's level of knowledge. But you absolutely should aim to understand the major muscle groups and key bony landmarks. Know where the biceps and triceps sit, how the quadriceps wrap around the thigh, and where to find the bony points of the pelvis (the iliac crest). This foundational knowledge is what separates guessing from constructing, allowing you to draw believable figures right from your imagination.
Ready to turn your passion into a business? MyMembers makes it easy to create a paid community on Telegram. Monetise your content with a no-code setup, automated member management, and powerful analytics. Start building your membership business today.